Fuse is a Microsoft Partner, based in Northampton. We help organisations of all sizes to maximise IT efficiencies through the use of Microsoft cloud computing solutions.
Using Disqus with SharePoint 2013
When creating a blogging site for Fuse Collaboration we did not want to use the out of the box SharePoint blog templates for reasons discussed in a later blog.
I decided instead to use a publishing site for blogging with a publishing page per blog post.
I needed to find a solution which would allow vistors to comment on our blogs which was easy to implement, secure and prevented spam. For this solution I turned to Disqus.
You can create an account on disqus and connect your blog to disqus. The benefits of this are that disqus prevents spam by requiring users to login using a Disqus, Facebook, Google or Twitter account.
Site administrators can then manage comments from the diqus website.
Disqus provides many other features and tools that I won't go into in this blog.
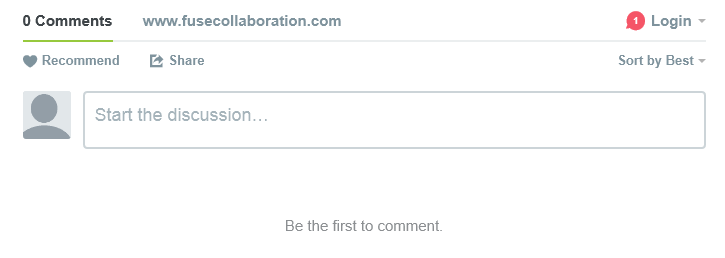
When disqus is added to your SharePoint page it provides a nice user friendly interface for viewing and adding comments.
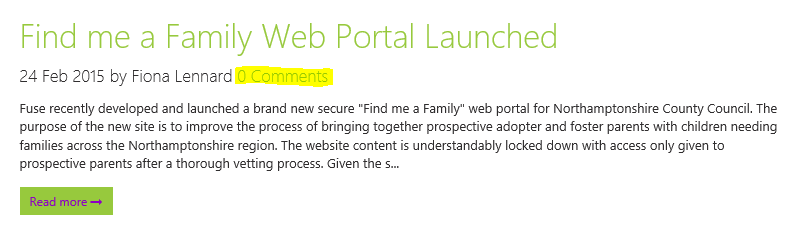
You can also embed your comment count into SharePoint display templates so that you can see the comment count next to posts in your search results.
This blog explains how we added Disqus to our blog site and will hopefully help you achieve the same results.
The Blog Post Page
The first thing you want to do is create a Disqus account, log in and register your site. Once you have done that click on the cog in the top right hand corner and select Admin, click on the Settings tab and click on the Install link which is in the top right.
On the Choose your platform page select Universal Code, you will need this code so keep this page open.
Return to your SharePoint site.
To add the disqus to your blog post page you have a couple of options. You can either put the code within your Page Layout as I did or you can use a content editor webpart.
Locate the code in Step 1 and copy/paste that into the script editor in the cotent query webpart.
Thats it!
The comments window will now appear on your page and can be used.
The Display Template
Adding the comments count to the display template was a little more difficult than adding the comment box to the blog post page.
Open your display template in a text editor and where you want the comment count to appear add the following line.
<a href="_#= ctx.CurrentItem.Path =#_#disqus_thread"></a>
Save and publish the display template
On the page where you will be using this display template add a content editor webpart and edit the HTML source. In the HTML source window add the following script, replacing websiteshortname with the shortname of your site as shown on the disqus web site.
<script type="text/javascript">
/* * * CONFIGURATION VARIABLES * * */
var disqus_shortname = 'websiteshortname';
/* * * DON'T EDIT BELOW THIS LINE * * */
window.onload = function () {
var s = document.createElement('script'); s.async = true;
s.type = 'text/javascript';
s.src = '//' + disqus_shortname + '.disqus.com/count.js';
(document.getElementsByTagName('HEAD')[0] || document.getElementsByTagName('BODY')[0]).appendChild(s);
};
</script>
This script is a slight amendment to the script provided in step 1 of the how to display comment count section of the disqus page you should have open in another tab/window. For this reason you could copy that code and amend it slightly adding the windows.onload = and removing the extra ().
If you have any questions or require more details then feel free to leave a comment.


